Set actions
Rules > Rules manager > Rule items > Set actions
Run IQL
Run IQL provides an open editor for entering functions and queries, as explained in the IQL topic. It offers greater control and flexibility, so we recommend using it instead of more limited actions such as:
-
Set the value of a field
-
Set access rights on record
-
Set the value of a field using IQL
-
Create a record
Besides, this editor enables code version control: Click on the  icon to show change information by line, or click on the
  icon to show history of such changes.
Send a notification
After clicking on the Add action button, add a recipient by clicking the To button. The Recipients pop-up is displayed offering several choices:
-
Roles. A role can be selected as the recipient. In this case, all users of the current application having this role will receive the notification.
-
Text fields. The value of a text field (placed on an application form) of the target record is read and used as a list of usernames (separated by semicolons).
-
Manually entered. A username can be typed manually here.
-
User. One or more specific application users can be selected as recipient(s). Users are added to the list of recipients either by double-clicking the corresponding line in the list of users, or by selecting the user by clicking once on it, then clicking the Add to recipients button. The corresponding user is added to the Current recipient list. To remove a user from the list, select it by clicking on the corresponding item in the Current recipient list and click the Remove from recipients button. Multiple users can be added in the way described above, but only one at a time can be selected for this operation.
-
Related field. Usernames from fields of related tables can be found and added in this tab.
Once you are finished adding recipients, click the Close button to dismiss the pop-up. The selected recipient(s) are displayed in the Recipients box. Also, additional settings can be specified:
-
Text. The text of the notification body is typed here. Optionally, format it with Markdown.
-
Show message in popup. Ideal to communicate a message to online users directly on their screen. For those users that were offline at the moment of the message being popped up, they will still get an alert about an unread notification via the Bell icon at the top of the screen.
-
Add field values. Select a field you want to add to the notification and then click the To text button. Note that only the value is included, i.e., a label or context has to be given, for instance "Invoice number: [VALUE Invoice nr]" or "The invoice number [VALUE Invoice nr] was paid on [VALUE Payment]".
-
Add related field value. A field from related records can be selected here. For instance, a notification that includes information about a student, about his/her teacher, and about the school he/she is studying at, i.e., data coming from 4 tables.
-
Link to form (classic) in the text. A bookmark to the selected form can be added to the notification by clicking the Add button.
If you prefer to insert a link that takes the user not only to the form but to the form selecting the target record, then try this instead:
-
In Form designer, open the desired form, select the section/Selector where the record will be rendered, go to Properties, and type any word in the URL parameter for selected record property, for example "MyParameter". Save the form.
-
Open the rendered form, click on Copy page link (find it at the three-dot menu of the form).
-
Paste it on the body of the message, and then click on the Add record name to text button.
-
Optionally, embed the link with Markdown, e.g., [click here](
https://MyIStoolsApp/apps/1051/forms/dynamic/3291891?MyParameter=RECORDNAME()).
-
-
Add a link to download a file. You may embed the link with Markdown, e.g.,
[download file here](https://swe02.istools.com/istools/apps/1801/tables/1/records/100551/fielddata/100500) -
Add a link to download a file. You may embed the link with Markdown, e.g.,
[download file here](https://swe02.istools.com/istools/apps/1801/tables/1/records/100551/fielddata/100500) -
Add record name to text. It’s up to the administrator to whether include or not the Record name in the Subject and/or the body of the message.
Create a record
Select the Table where the new record will be part of. Then, select the wished Record group to store it, or keep the automatic option in case you want to assign the same Record group of the record triggering the rule.
Optionally, choose Relation on new record to assign target record to, in case you wish to make the new record to become a child record of the target one (i.e., parent record), or Relation on target record to assign new record to, to assignt the new record as the parent table of the target record (i.e., child record). Note that these options are available only if the Table selected above and the target table of the rule have a relationship previously configured.
|
You can also customize the name of the new record, or existing records, for instance concatenating a prefix with a consecutive number like "ACME-1001". For that, create another rule action of type Set the value of a field with a formula, and select Record. |
Set the value of a field
Select this action, if you want to change the value of a field to a constant value or to the current value of another field. Click on the Add action button. Then, choose the type of the field to be changed. Find and select that field in the drop-down list below, and type the New value or select other value (it can be a Field with new value or other parameter, depending on the type of field). Also, specify if the current value stored in the target field will be replaced or a new value will be inserted after the old value.
Set access rights on record
Select this action to change the access rights of a record by moving it to a specified record group. Click on the Add action button. Select the record group that the record will belong to. This group must be pre-configured with the desired access rights.
Send a mail
After clicking on the Add action button, add a recipient for the e-mail message, by clicking the To button, and/or CC and BCC buttons. The Recipients pop-up is displayed offering several choices:
-
Roles. A role can be selected as the recipient. In this case, all users of the current application having this role will receive the e-mail message.
-
Teams. If a team of users is selected, all members of the team will receive the e-mail message.
-
Contact. An e-mail will be sent to the e-mail address stored in the record specified here of the Contact table.
-
Contact fields. An e-mail will be sent to the e-mail address stored in a record of the Contact table pointed to by a relation of the target record.
-
Text fields. The value of a text field (placed on an application form) of the target record is read and used as a list of e-mail addresses (separated by semicolons). It is the user’s responsibility to make sure that records of the target table have a valid e-mail address stored in this field, because these addresses cannot be verified by the system while creating a rule (i.e., the system cannot know in advance which record will trigger this rule).
-
Manually entered. An e-mail address can be typed manually. The typed value is checked for compliance with the acceptable syntax for e-mail addresses, but it is the administrator’s responsibility to verify that it corresponds to an actually existing e-mail account. The typed e-mail address is used for all records affected by the rule.
-
User. One or more specific application users can be selected as the recipient(s). Users are added to the list of recipients either by double-clicking the corresponding line in the list of users, or by selecting the user by clicking once on it, then clicking the Add to recipients button. The corresponding user is added to the Current recipient list. To remove a user from the list, select it by clicking on the corresponding item in the Current recipient list and click the Remove from recipients button. Multiple users can be added in the way described above, but only one at a time can be selected for this operation.
-
Related field. E-mail addresses from fields of related tables can be found and added in this tab.
Once you are finished adding recipients, click the Close button to dismiss the pop-up. The selected recipient(s) are displayed in the Recipients box. Also, additional settings can be specified:
-
Subject. The text of the e-mail subject header is typed here.
-
Attachments. This shows the File fields added with the Add field values setting.
-
Importance. An importance level of the e-mail message can be selected.
-
Text. The text of the e-mail body can be typed here.
|
You can format your text with Markdown. |
-
Add field values. A field value of the target record can be selected here. The value of this field is added to the body of the e-mail by clicking the To text button, and/or to the subject header of the e-mail by clicking the To subject button. Note that only the value is included, i.e., a label or context has to be given, for instance "Invoice number: [VALUE Invoice nr]" or "The invoice number [VALUE Invoice nr] was paid on [VALUE Payment]". Click on As attachment to include a file in the e-mail.
-
Add related field value. A field value from related records can be selected here. For instance, an e-mail that includes information about a student, about his/her teacher, and about the school he/she is studying at, i.e., data coming from 4 tables. Same buttons as described above.
-
Link to form (classic) in the text. A bookmark to the selected form can be added to the body of the e-mail by clicking the Add button.
If you prefer to insert a link that takes the user not only to the form but to the form selecting the target record, then try this instead:
-
In Form designer, open the desired form, select the section/Selector where the record will be rendered, go to Properties, and type any word in the URL parameter for selected record property, for example "MyParameter". Save the form.
-
Open the rendered form, click on Copy page link (find it at the three-dot menu of the form).
-
Paste it on the body of the message, and then click on the Add record name to text button.
-
Optionally, embed the link with Markdown, e.g., [click here](
https://MyIStoolsApp/apps/1051/forms/dynamic/3291891?MyParameter=RECORDNAME()).
-
-
Add a link to download a file. You may embed the link with Markdown, e.g.,
[download file here](https://swe02.istools.com/istools/apps/1801/tables/1/records/100551/fielddata/100500) -
Add record name to text. It’s up to the administrator to whether include or not the Record name in the Subject and/or the body of the message.
Set the value of a field with a formula
This action changes the value of the selected field to a new value computed with a formula. By choosing this action, it is possible to select the field to which the formula will set its result, one or more built-in functions, mathematical operators, constants and other fields that will be a part of the formula.
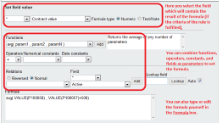
Set field value. This is a list of fields of the Target table. Select one. The formula will change the value of this field. To easily find a field, you can use the the drop-down to the left of this list, which contains * by default, to filter fields per type.
The Formula type radio buttons indicate either what kind of value the result of the formula will have or what kind of parameters are used in the formula:
-
Numeric, if the target field (i.e., the field which will get the resulting value of the formula) is Number, Date, Date time or Checkbox (checked = 1, if not checked = 0). All values retrieved will be interpreted as numbers, meaning that strings (text) included in the formula will be converted to a number. But if a string cannot be converted, then it will be interpreted as 0. A formula of this type returns a number as a result.
-
Text/Note, if the target field is Record, Record group, Text, Note, Drop-down, Link or Relation or if there is any string in the Formula box used as parameter (i.e., a text within quotation marks, e.g., moveToRecordGroup("STANDARD")). A formula of this type returns a string as a result. It interprets any value, such as alphabetical and special characters, and even numbers, but treated as text. Date and Date time values need to be converted to a string (toDatePattern, toDateString and toDateTimeString functions) before they are included in this type of formula. For Relation, the Text value provided must exactly match (case-sensitive) an existing Record name of the related table.
Functions. Select a function in the Functions drop-down, and note that the list box at its right displays a description of the function syntax and operation. Click on the Add button to insert it into the Formula box at the bottom of the form. If this box already contains text, insertion takes place at the current caret position in the box.
Operators, Numerical constants, Date constants and String constants. Select an item in one of these drop-downs in order to insert it at the current caret position into the Formula box at the bottom of the form. Numerical and date constants can be used with implicit multiplication, e.g. currentDate() + 2D – 2MO.
|
The [Month] and [Year] time constants are approximate. One month is set to 31 days, and one year to 365 days. Also, one day is 24 hours, but may be 23 or 25 hours when the daylight saving time change occurs. |
Other examples:
-
(Actual date - Plan date) / D → D: In this case, to return in days a subtraction of. -
if (hasRole("MANAGER 1") OR hasRole("MANAGER 2"), "Reviewed by the Manager", 0) → OR: To have an alternative condition in the formula (i.e., at least one the conditions need to be fulfilled to take action) -
if (Order total > 1000 AND Status = "Ongoing", Requires approval from Manager = 1, 0) → AND: To have an additional condition in the formula (i.e., both conditions need to be fulfilled to take action) -
"Revised on " + Revision date + "by " + Revision user + NEWLINE → NEWLINE: To return a value or concatenation of them in a Note field inserting a new line (i.e., carriage return)Note that some of the operators will be represented by special characters when added to the Formula box, e.g., AND turns to &&, OR to ||, etc.
Set a field into the formula. If you want to include a field into the formula, find and select that field in the Field drop-down list (located in the third section of the current window), which displays all fields of the Target table (to easily find a field, you can use the the drop-down above this list, which contains * by default, to filter fields per type). But if you want to select a field that belongs to other table that has a relation with the Target table, choose either a Reverse or Normal relation, and then choose a relation in the Relations drop-down list. This action will refresh the list of fields available to select and use into the formula. Click the Add button to insert the field.
|
If you want to insert a field as parameter of a function, you will have to first double-click the parameter in which the field will take place, before you click the Add button to add the field. |
Formula box. Items selected with the drop-downs above (functions, operators, constants and/or fields) will be inserted at the current cursor position in the Formula box. Here, fields are indicated by their REF (this is an IS Tools numerical reference used to uniquely identify fields within an application) in the formula, not by their name. In this box, the formula can be edited or directly configured.
Lookup field. To verify which field has a given REF (this is an IS Tools numerical reference used to uniquely identify fields within an application) , you may click the value of a REF in the Formula box to show its value to the text box in the Lookup field. You may also type or paste the value of a REF into the text box in this section. Click the Lookup button to display the name of the field in the Field drop-down. You may alternatively tick the Auto checkbox to look up REFs automatically without clicking this button.
A formula must be validated (with the Validate button at the bottom of the form) in order to save it. If the formula is successfully validated, the Next button becomes enabled.
Send an SMS
This action makes it possible to send a text message to a mobile phone via SMS.
After selecting this action, click on the Add action button. Add a valid mobile number by clicking the To button. The Recipients pop-up is displayed offering several choices:
-
User. One or more specific application users can be selected as the recipient(s). Prior to this, mobile numbers have to be registered for the users in the User administration form.
-
Text fields. The value of a text field (placed on an application form) of the target record is read and used as a list of mobile numbers (separated by semicolons), e.g., the chosen Text field might be called "Mobile phone number" which might store for a specific record the values "+46706988621;+46706988622".
It is the user’s responsibility to make sure that the values entered in such a Text field are valid mobile numbers with international format (i.e., +<country code><mobile number>, like +46706988621, where the "+" is optional), because these numbers cannot be verified by the system while creating a rule (i.e., the system cannot know in advance which record will trigger this rule). Note that the ”+” prefix is intentionally optional, to facilitate imports of phone numbers from Excel.
-
Manually entered. A mobile number can be typed manually. It is the administrator’s responsibility to verify that it corresponds to an existing number typed with international format (i.e., +<country code><mobile number>, like +46706988621). The typed number is used for all records affected by the rule.
-
Related field. Phone numbers from fields of related tables can be found and added in this tab.
-
Roles. The recipients will be all users assigned to the role(s) selected.
Users, text fields and/or manually entered number are added to the list of recipients either by double-clicking the corresponding line, or by selecting the item by clicking once on it, then clicking the Add to recipients button. The corresponding item is added to the Current recipient list. To remove an item from the list, select it by clicking on it in the Current recipient list and click the Remove from recipients button. Multiple items can be added in the way described above, but only one at a time can be selected for this operation.
Once you are finished adding recipients, click the Close button to dismiss the pop-up window. The selected recipient(s) are displayed in the Recipients box. Also, additional settings can be specified:
-
Sender. Here can be typed the name of the entity (i.e., name of the company, person, etc.) sending the message. Also, the value of a field can be used as sender, for that click the To sender button after choosing the field in Add field values or in Add related field value described below. If nothing is specified or the selected field has no value, the sender set by the server administrator will apply; otherwise, IS Tools will be the default sender.
-
Text. The text of the message can be typed here. Note that you can limit the number of messages by clicking "1 SMS", "2 SMS" or "3 SMS" button. For instance, if the text is larger than 160 characters and "1 SMS" is set, the recipient will receive only one message with a text cut up.
-
Add field values. A field value of the target record can be selected here. The value of this field is added to the message by clicking the To text button, or it can be added as the entity sending the message by clicking To sender. In the latter case, only Text, Note, Relation, Number and Drop-down fields are supported.
-
Add related field value. A field value from related records can be selected here. For instance, an SMS including information about a student, about his/her teacher, and about the school he/she is studying at, i.e., data coming from 4 tables. Same buttons as described above: To text and To sender.
-
Link to form (classic) in the text. A bookmark to the selected form can be added to the body of the e-mail by clicking the Add button.
If you prefer to insert a link that takes the user not only to the form but to the form selecting the target record, then try this instead:
-
In Form designer, open the desired form, select the section/Selector where the record will be rendered, go to Properties, and type any word in the URL parameter for selected record property, for example "MyParameter". Save the form.
-
Open the rendered form, click on Copy page link (find it at the three-dot menu of the form).
-
Paste it on the body of the message, and then click on the Add record name to text button.
-
Optionally, embed the link with Markdown, e.g., [click here](
https://MyIStoolsApp/apps/1051/forms/dynamic/3291891?MyParameter=RECORDNAME()).
-
-
Add record name to text. It’s up to the administrator to whether include or not the Record name in the Subject and/or the body of the message.
|
You can verify the status of the text messages via the Message log form. |
Set the value of fields using IQL
In the Fields to use (in list order) box, select the field(s) which will store the resulting value (i.e., the target field). In the IQL box, type:
-
The name of field(s) that contain the value you want to set. This field can be accompanied by a function.
-
The table of the above field(s). Can be any table (the same target table, a related one, or even a table with no relation with the target). The keyword from must be used, like from table.
-
The criteria to find the value.
For instance, in Fields to use (in list order), select Responsible, and in IQL, type Name from Employee where Project = 'Campaign' and Approved is not null.
If you select multiple fields (to obtain more values at once), like Responsible, Years of service and Current manager, make sure you type the necessary fields in the right order, separated by commas, like Name, Seniority, Manager from Employee where Project = 'Campaign' and Approved is not null.
Other elements like operators, functions and system defined fields can also be included.
Examples:
-
createdusername(Name) from Employee where Project = 'Campaign' and Approved is not null -
recordid, Name, createddate(Name), createdrealname(Name), updateddate(Name), updatedrealname(Name) from Employee where updateddate is not nullSystem defined fields can be used as functions at Record level or at Field level. For the latter one, the field must be provided after the function within parentheses. For example, while createddate(Field) refers to the day the Field was inserted, createddate refers to the day when the record was created.
-
Customer from Order where recordname in(Order from OrderItem where Total > 10000), note how a query can be nested within a main one. -
min(DeliveryDate) from ProductTable where Product = ‘A’ and RelationToShipmentTable = @targetrecord, would return the earliest date not only from all products that are ‘A’ in the whole table, but from a limited bunch of rows that are children of the parent being targeted in the form. -
Field from Table where Product = @triggerrecordmakes reference of the record that triggers the rule. -
round(avg(NumberField1)) from Table1to remove decimals from the number resulting from average of all values in NumberField1 -
upper(CustomerName) from CustomerTablewould return the Customer name string in uppercase. -
substring(TextField, 0, 2) from Table1would return ABC for a TextField with value ABCDE. -
Concatenation is not a function but the || operator can be used for that purpose; e.g.:
Text1||'-'||Text2 from Table1would result in Value1-Value2 -
geodist(latiude, longitude, latitude2, longitude2), to get the distance in kilometers between two locations (i.e., records). -
usergeodist(latitude, longitude), to get the distance in kilometers between a user and a location.
|
Note that there are also useful functions for geolocation via rule action formulas and validations. |
|
Set field values using IQL can only have one result to set as value. If the IQL query returns more than one result from multiple rows, the value from the first row will be set. If the IQL query does not return any result, i.e., no row is found, no value will be set nor changed on the target record. |
|
Read more about the syntax, functions and examples of IQL here. |