Many-to-many relationship between tables
Application configuration > Data model editor > Many-to-many relationship between tables
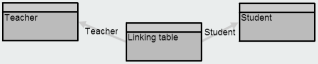
Tables in a data model are often related in a way that defines one table as parent, and another as child, where one record of the first one can have a relation with many records of the second table, for instance, an Invoice having many Items, or many Service orders requested by a Customer (i.e., a one-to-many or many-to-one relationships). But there are business cases where it’s necessary to establish a many-to-many relationship where the records of the tables can be related both ways, for example, in a school a Teacher has many students, and a single Student has many teachers. In a company a Manager is responsible for many employees, and a single Employee may be reporting to more than one manager.
IS Tools makes it possible to have a many-to-many relationship via a junction table that will link the two tables in consideration. To implement this, follow the steps below:
-
In Data model editor, create the two tables that you wish to see in forms in a many-to-many relationship. Based on the example above, create "Teacher" and "Student", with some fields.
-
Create a third table with:
-
two Relation fields, one for each table above (no more fields than these two are recommended for many-to-many, instead it is a feature for one-to-many),
-
a Default record group, and
-
Record name as Generated series.
You may call it "Linking table" with relation to "Teacher" and "Student".
-
-
Save the changes.
-
In Form designer, create a form, and:
-
select the first table above and drag and drop it to create a Detail section*. For instance, a form called "Teachers". If you like, add some fields created in step 1.
-
Note that this table shows a reverse relation field (
 ), e.g., "Teacher Linking table → Student". Select it so an additional "Fields" panel in Data model editor is displayed, where a direct relation (from the linking table to "Student") can be found. Drag and drop it onto the Detail section. A Multi value is added to the form section.
-
-
Save this form and create a new one for the second table created in step 1, also adding the corresponding Multi value. For example, this form can be called "Students". Save it.
-
Open the generated forms and create records, e.g., . For instance, "John Smith" and "Aurora McArthur" for the "Teachers" form, and "Jimmy", "Charly" and "Laura" for "Students".
-
Once the records are saved, use the Multi value to relate multiple records from both tables.
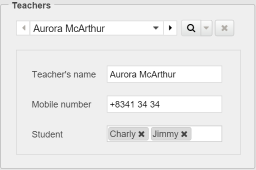
| Note that the Multi value can be resized so related records can be seen for instance in a vertical way, or much wider to show more records. |
|
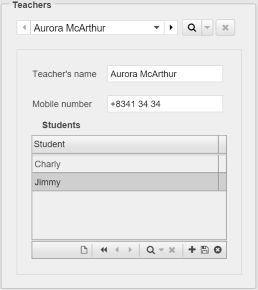
You can also consider configuring the form in step 4, adding the Linking table as a Table section instead of the Multi value. However, note that no access rights will be checked on the linking records, i.e., this is a special table that is not bounded to rights like regular tables do in the system.
|
*Multi detail and Table sections can also be used for this purpose.