Report macro files
Reports > Report macro files
The Report macro files form is used to upload and stored Excel macro files in an application. The macro file can be selected when creating or editing a report in the Report wizard. This way, every time the report is generated, the macro will automatically work as a template, setting the report to a customized layout and design.
|
This form is not available by default in a new application. It must be added to it by the server administrator. |
When an application is created, it initially contains no macros. It is the responsibility of the application managers and/or users to create and maintain these files. This documentation does not deal with the procedure of writing and maintaining Excel macros, as they do not actually concern the IS Tools platform.
IS Tools generates reports in xlsx format. Report macros should be saved and uploaded to the application in XLSM format (Excel Macro-Enabled Workbook).
|
In general, one should keep in mind that editing the settings of a report in IS Tools and/or the tables and fields used by the report may cause earlier Excel templates to stop working, depending on how they reference data, and/or on how they expect data to be available, in the resulting Excel sheet. A further point to remember is that filters and rules should be used to appropriately restrict the range of data compiled by IS Tools into a report. This will affect the size of the generated Excel file and the performance of macros contained in the template, once executed on the client computer. |
To upload an Excel macro, click the Browse button to open a pop-up dialog in which you can select a file on the client computer. The appearance of this dialog depends on the version and type of web browser. Alternatively, you can type a path and file name in the text-box at the bottom of the form. Click the Upload new template button. This uploads the selected file to the server. Existing macros are listed in the topmost portion of the form. You can use this form also to delete and download the files that contain macros.
|
Note that template will be named after the first file uploaded, i.e., browsing and uploading a different file instead of the one already uploaded will not change the name given the first time. |
To delete an Excel macro file, click the icon displayed at its left.
To download an Excel macro file, click its file name in the form.
|
The intention of templates in IS Tools platform is to enable attachment of macros to reports generated in Excel format. The template should merely act as a container for the Excel macro to be run and the template files are not intended to hold any formatting, functions or data in them other than the macro. Since the Excel template is created outside the system, IS Tools cannot limit what the user is creating in the macro template. In some cases functions, formatting and data can be entered in the Excel template without breaking the report using the template. This is however not supported by IS Tools and will be introduced on own risk. If a report using a template fails to execute properly, it’s most likely because the template files contains information that the system cannot parse. This can be such things as (but not limited to) formatting, references, diagrams, cell locking etc. In some cases it is very hard to see what is causing the problem since Excel does not show for example cell locking for the user. |
Note that running an XLSX report with a macro template will attempt to create the first sheet as "DRT" if possible, otherwise it will rename it to DRT_1, DRT_2, DRT_3 etc.
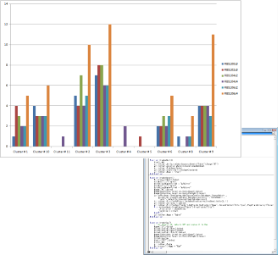
Below, an example of a report generated with an Excel file (topmost) and source code of Excel macro copied from the template and inserted into the output file of the report by IS Tools (bottom).
For a simple example to follow, you can consider the following:
-
In Report wizard, create a template that will generate something similar to this data:
Order Days to be approved Days to be completed Total days O001
2
10
12
O002
3
9
12
O003
7
7
14
O004
3
7
10
O005
4
7
11
O006
4
8
12
O007
1
9
10
O008
0
9
9
O009
6
10
16
O010
4
7
11
O011
4
7
11
O012
4
8
12
O013
3
8
11
-
Open Excel and, on an empty Excel workbook, under the Developer ribbon, click on Visual Basic.
-
In the Project Explorer, double-click on ThisWorkbook and paste the code below:
Private Sub Workbook_Open()

Dim rng As Range
Dim cht As Object

Set rng = ActiveSheet.Range("A6:D19")

Set cht = ActiveSheet.Shapes.AddChart2

cht.Chart.SetSourceData Source:=rng

cht.Chart.ChartType = xlColumnClustered

End Sub-
Close the window and save the file with the name you wish, but with the format .xlsm (Excel Macro-Enabled Workbook).
-
In the application, upload the macro template.
-
Edit the report template you created (via Report wizard), so in the screen "Records to include" you can select the newly uploaded macro in "Macro/transform" setting.
-
Go Next until the Report is Done.
-
Go to View reports, select the updated report template and run it. Note that the Format setting in the pop-up window before generating the report says "Excel with template".
-
Go to the Report queue, download the report and verify that the graph is automatically created right after opening the file.