Fields
Application configuration > Data model editor > Fields
A field in a table specifies the type of data that can be stored in all records of the same table. For instance, the table called "Contacts" may define fields like "Last name", "Mobile number" and "Date of birth", where data of the type text, number and date will be stored, respectively. In other words, data is arranged in fields, which correspond to columns in a table. Each field is configured by an application administrator and is meant to contain data of a given type (text, number, date, etc.).
The Data model editor allows the application administrator to perform the following actions related to fields:
Create a field
Select the table in the Tables tab, then click the  icon in the Fields tab. By default, a new field is named New field n (where n is a progressive number). Type a new name in the currently selected line of the Name column (field names must be unique within the same table).
Then, select the type of field you need in the next column (for description of field types, read the Field types topic).
Other settings are:
-
List/Parent table: For Drop-down fields, this setting must be used to select an existing list (i.e., the list of items shown to the users in application forms) and associate it to the drop-down field. The same list may be shared by multiple Drop-down fields, if desired (e.g., a list with values "Yes" and "No" can be associated to many drop-downs). Read how to create a list. _For Relation fields, this setting must be used to choose the table to which the current table will have a relation with; for example, the Relation field "Main order" is created for the table "Suborder", to have a relation with the table "Order" chosen as parent table, meaning that a suborder will belong to an order. For further information, read the description of the Relation field type in the Field topic.
-
Mandatory: Ticking this checkbox, forces the user to enter a value in this field when records are created or edited; i.e., the field cannot be stored as empty. This setting is not available for fields of type Checkbox and File.
|
Mandatory fields are also mandatory in Imports, and they are automatically added when creating an import configuration of type INSERT. An import Excel file that lacks a value for a mandatory field will fail. |
|
It is possible to set a field as Mandatory even if a table already has records with no data on this field, but be aware that it will not be possible for users to save these records until a value is set. |
-
Unique: Ticking this checkbox will ensure that the system will verify that the value entered in the field of a record is unique with respect to the same field in other records of the same table (either during its creation or subsequent editing). However, to leave the field with no value (i.e., empty) is allowed. This setting is not available for fields of type File and Note.
|
This setting is not applied retroactively. If two or more records already have the same value in the same field when the field is set to unique, these values will remain unchanged (and therefore non-unique). The uniqueness of a field is verified and indicated by the system with a pop-up message, only when the value of the field is about to be saved in the application form. Unique fields must also have a unique value in imports. An Excel import file that contains duplicate values for a field set as unique will fail, i.e., will not insert the duplicate and will indicate this as a remark/warning in the import log. |
-
Delete constraint: For Relation fields, this setting is useful to prevent the deletion of a record that has related Child records, in order to avoid the so-called orphan records. For example, having a Relation field with this checkbox ticked, from the Table "Student" towards the Table "Teacher", will make it impossible for users to delete Teachers that have Students, displaying the warning pop-up "Cannot delete record, child record exists".
|
You may use Delete constraint together with Mandatory, in case you want to force users to always have a Parent record associated the Child record. This way, it wouldn’t be possible to delete the Parent record nor to save an empty the Relation field of the Child record. |
-
Groups: If not set, the default group will be assigned. Create more groups if necessary.
There are more properties that are initially hidden, but can be shown by clicking on the  icon found at the left top of the Name column:
-
Id: The fieldId.
-
Description: A text may be typed to explain the purpose of the field.
-
Table. The table it belongs to. Cannot be edited.
-
Filter by: In case there are other drop-downs that control this one. Read more about lists.
-
Read log: Check this box to keep a history of who see this field, where and when, via the Read log form.
Note that unsaved items are indicated with an asterisk (*) at the left of each field with changes. These characters will disappear after clicking the Save button.
|
Clicking the Usage report icon, located at the top of the Fields section, displays a report of all forms, imports, reports and rules using the currently selected field. This is useful, for instance, to obtain information about into which forms a field has been added, in case it is meant to be deleted, because the boxes displaying this field must be removed from all forms, before the field itself can be removed from the data model. |
|
To be able to quickly find certain fields, use the filter by hovering over the heading of the Name column, and click on the |

Edit a field
To rename a field, select the table in the Tables column in order to display all its fields in the Fields column. Double-click the current name of the field and type a new name (field names must be unique within the same table). Save.
To edit a field setting, select it, change its properties and Save.
|
The field type cannot be edited. If the wrong field type has been saved, the field must be deleted and a new one created. Also, the parent table setting of a Relation field type cannot be changed once the table contains records. |
When a field is edited (its name and/or its settings), note that unsaved items are indicated by and asterisk (*) next to them. This provides a visual feedback, informing that there are pending changes that need to be saved. At this point, navigating away from the current form will discard the pending changes. Once the changes have been saved (by clicking the  icon), they cannot be undone (except by manual editing).
Delete a field
Select the field you want to delete and click the  icon near the top of this column. This operation remains pending until you save the form.
Once the field is selected, click on the Usage report to see in detail if it has data and/or where in the application is being used.
|
A field cannot be deleted if used in an application form, import or report, or if it has data. Remove it first from these elements or empty its data. On the contrary, private filters that end users have made using the field in question will be automatically deleted, which will be informed to the user who created the filter via Notifications. |
Link a drop-down field
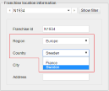
It is possible to restrict or change the display of values in a drop-down field, depending on the value selected in another drop-down list placed in the same application form. For instance, if a user selects the value "Europe" in the drop-down called "Region", the next drop-down called "Country" will only display values like "Sweden", "France", etc. But if the user selects the region "Asia", then the countries will be "China", "Japan", etc.
This functionality is called Linked drop-downs or Linked lists and is configured as follows:
-
Make sure the drop-downs you want to link:
-
Have been created in the same table.
-
Have selected a list (which preferably have a complete list of values).
-
Are saved after a and b.
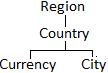
As in the example above, the drop-down "Region" is associated to the "List of regions", which contains the items "Europe" and "Asia". In the same way, "Country" is assigned to "List of countries", containing "Sweden", "France", "China" and "Japan".
-
-
Relate the drop-down fields: In the Fields tab, select the drop-down that you want to subordinate and edit it by choosing a parent drop-down (i.e., the one that will control it) in the Filter by setting; e.g., "Region" would be chosen for "Country", since a country depends on its region.
-
Define the Parent items: In the Lists tab, select the list associated to the parent drop-down (in the current example, "List of regions" would be selected), and edit its items, one by one, changing its Type (originally called List item) to Parent item; e.g., "Europe" is selected and edited to be Parent item as Type. Same for "Asia". Save.
-
Relate the list items: In the Lists tab, select the list associated to the depending drop-down (in the current example, "List of countries" would be selected), then select those items (use
Ctrl+click, orShift+click) that will be depending by a specific parent, and click on the icon to assign parent; e.g., the items "Sweden" and "France" would be selected and assigned to the parent "Europe".
|
More than two drop-downs can be linked in a chain and/or sharing master drop-downs, e.g., |

Link a relation field
It is possible to restrict or change the display of values in a relation field, depending on the value selected in a previous relation field, placed in the same application form of the table where these two relations were created. For instance, a user creating a Purchase order, selects the record "Sweden" in the relation box called "Country", and the next relation box called "City" will only display records like "Stockholm" and "Gothenburg". But if the user selects the country "USA", then the cities shown will be "New York" and "Los Angeles", etc.
This functionality is called Linked relations, and differs from the Linked drop-downs functionality in that the values selected by the user are not items created by the administrator, but really are records that belong to tables related to each other, entered in application forms.
Follow these steps to link relation fields:
-
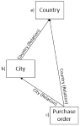
Make sure you have three tables (see the tip box below for cases with one or two tables), with the following characteristics:
-
The first table, represents the first relation box that will control the subsequent ones. As in the previous example, this table is "Country".
-
The second table, represents the second relation box, of which values will depend on the previous relation selected. This table must have a Relation field which Parent table is the first table. For instance, this table is "City" with a relation field pointing to "Country".
-
The third table, which is the main table of the form where the two linked relations are displayed to the users. Therefore, this table must have Relation fields pointing to the other tables. For instance, this table is "Purchase Order", with two relation fields: one pointing to "Country" and the other pointing to "City".
-
-
Edit the second relation field of the third table, by setting the Filter by box to the option where both its parent tables coincide in those records which the current selected relation field will be controlled by. For instance, in the table "Purchase Order", select the relation field "City" and edit the above setting to "City of parent record = Country". This means that the field "City" depends on the field "Country" in any form using the "Purchase Order" table.
|
A relation field can also be self-referenced, i.e., pointing to the same table the Relation field is created from. Example 1: The table "Project" may have a "Manager"-"Employee" linked relation structure, where both relation fields have "Personnel" as parent table, while "Personnel" has the relation field "Manager" pointing to itself. In this case, note that only these two tables are needed, since "Personnel" will be used not only to create managers in one application form, but also used to create employees in another (choosing its manager). Example 2: A single table "Person" may have multiple relations to itself to be able to link to a "Parent" and a "Sibling". Ask the IS Tools support team for more detailed information. |
-
Create the values (records) that the relation field boxes will display:
-
In a form of the first table, create the necessary records; e.g., the form "Country" must have two records: "Sweden" and "USA".
-
In a form of the second table, create the necessary records and select their proper relations; e.g., the form "City" must have the records "Stockholm", "Gothenburg", "New York" and "Los Angeles", where the first two will select "Sweden" in their "Country" relation box, while the second two will select "USA" in their "Country" relation box.
-
-
Create a form of the third table, where the two linked relations are displayed and ready to be edited and saved; e.g., the "Purchase Order" form, showing, amongst other fields, the "Country" and the "City" relation fields.