Field rights
Access rights > Field rights
To assign access rights on fields, open the Field rights form, located in the Rights folder, under Administration in the navigation menu.
In this form, you can either give to each role:
-
general access rights that apply for all the fields (recommended),
-
or specific access rights per selected fields (powerful but complex setting that must be used with caution).
The available access rights for fields may vary depending on their type, but in general these rights are S, U, I, D (select, update, insert and delete respectively), which have effect on the values of the fields, not on the field itself, i.e., the U right means that the value of a field can be updated, but not the name of the field.
|
Note that full field rights for ADMIN and USER roles are granted by default in a new application. |
General access rights for all fields
In the Field rights form, tick the S U I D rights in the Level 1 column, for those roles who need to see and update fields in the application. And tick the S right, also in the Level 1 column, for those roles who only need to see fields. Click the Save button. There is no need to use other levels or other buttons (Refresh, Select fields and Export to Excel).
|
In case there are several fields that a role should not be able to update, you could still grant S U I D for all fields, and then have a form for this role where these fields are set as read-only in the Form designer. In that way you avoid dealing with specific access rights per selected fields. Otherwise (if those fields are present in many forms and some user roles shouldn’t even see them), it could be more convenient to set specific access rights per selected fields. |
Specific access rights per selected fields
In the Field rights form, click the Select fields button, which displays a window. Choose the Groups option and click the Search button, to be able to find the tables of the application. Double-click one of them, and then double click one or more fields to add them. Click Update to show them in the form. Alternatively, choose the Fields option to see all fields, or use the filters to easily find a field.
Once the selected fields appear on the form, note that they have the following right options:
Fields |
Rights |
|||
|---|---|---|---|---|
S (Select) |
U (Update) |
I (Insert) |
D (Delete) |
|
Field of File type |
The file can be downloaded. |
A new file can be uploaded. |
An existing file can be deleted. |
|
Lists (of Drop-down type) |
The values in the list can be seen, if the drop-down has S-right too. |
The name of the values in the list can be edited. |
New values can be added to the list. |
Values can be deleted from the list. |
Other field types |
The field value can be seen. |
The field value can be changed. |
||
Tick the proper rights on different levels per role that has specific needs. For instance, rights on Level 1 only for ADMIN, rights on Level 2 only for "Role1", and rights on Level 3 only for "Role2". Also, the selected fields' rights must be ticked under each level. Click Save after changes are made. See the image and read the case below for a better understanding.
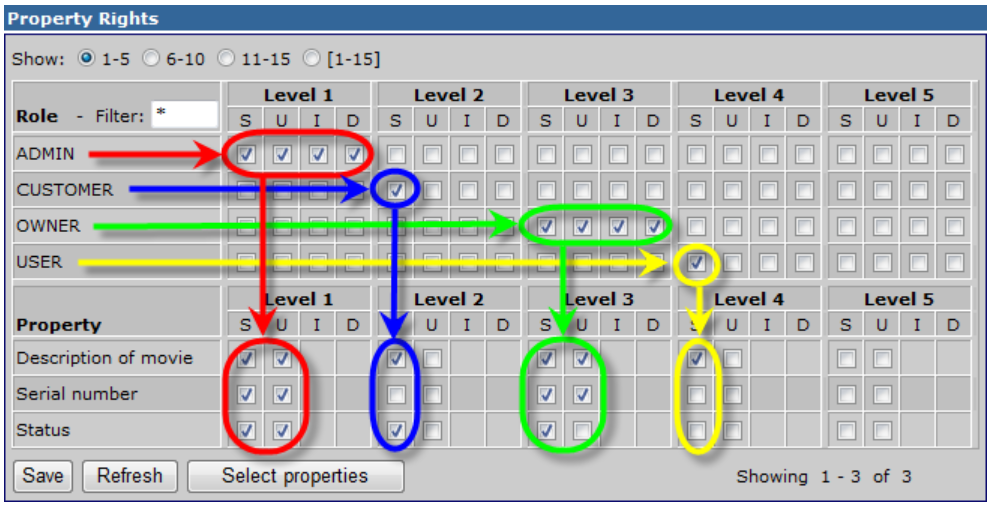
As an example, we assume that four roles exist, called ADMIN, CUSTOMER, OWNER and USER, and access rights must be granted to the fields called Description of movie, Serial number and Status. The following procedure is carried out:
-
ADMIN it set to full access by default. So, in the Level 1 column, the S, U, I, D check-boxes are already ticked for this role (in the image above, the lines in red), meaning that all types of fields have full rights too. The selected three fields at the bottom of the form confirm this. Note that no other role has rights on this level.
-
CUSTOMER is supposed to have only read rights on Description of movie and Status. This requires a different combination of rights than ADMIN. Therefore, we must use a new column. Thus, we tick the S checkbox on the same line as CUSTOMER in the Level 2 column. We descend from this checkbox to the lines of the fields, and tick the S checkbox for the two selected fields. Thus, CUSTOMER has no access to the Serial Number field. This procedure is outlined in blue in the image above. Note that no other role has rights on this level.
-
OWNER is given full access rights in the Level 3 column (this may be necessary, for instance, to enable users in this role to upload files to, or delete files from, a File field). This role is also given full access to the Description of movie and Serial number fields. However, this role is to be given read-only access to the Status field. This procedure is outlined in green in the image above. Note that no other role has rights on this level.
-
USER must have read-only access to Description of movie, and no access to the other selected fields. This is done by using the Level 4 column, as outlined in yellow below. Note that no other role has rights on this level.
|
If a role has rights on several levels, the rights that are granted will have precedence on the once that are not. Based on the example above, let’s say that the CUSTOMER is granted the S right on Level 3 too. In this case, the Serial number field has no S right on Level 2, but it does have it on Level 3. The result of this is that CUSTOMER will be able to see the Serial number field, since the IS Tools access control system is based on an "allow" logic. |
|
Fields without the S right will not be rendered in forms. |
|
Online users will see/stop seeing fields with newly modified S right only after reloading the respective form, whilst changes on U, I, D rights take effect immediately upon saving the record. |
Specific access rights for Import templates
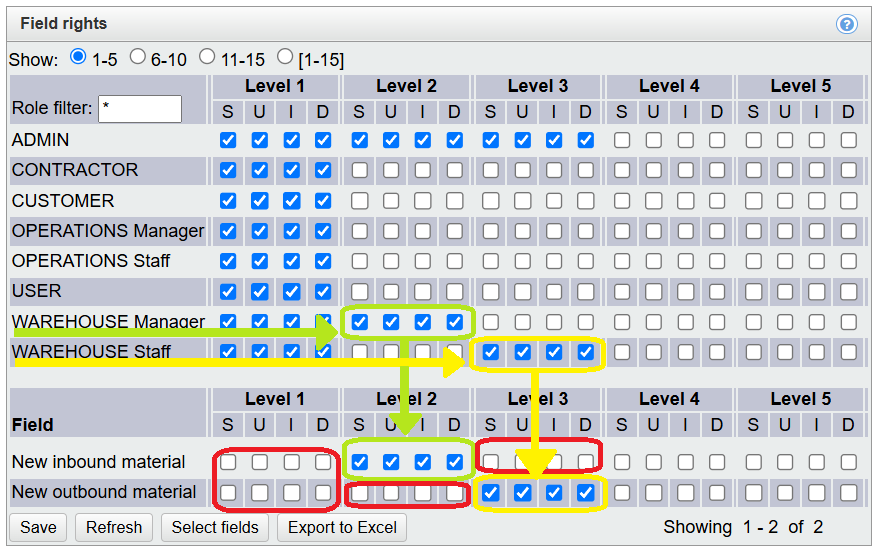
Let’s say that you created the templates "New inbound material" and "New outbound material", where the first one will be used by the Warehouse manager, and the second one by Warehouse employees. To avoid mistakes in choosing the wrong template when is time to upload files, you want to exclusively show the proper template to each role.
For that, in the Field rights form, click the Select fields button, which displays a window. Choose the Fields option, then select Import as Field type" and click the Search button. Double-click both templates to add them to the left-hand section, where you have to click on Update to return to the main form.
Use the Levels accordingly, as described in the previous topic, and similarly as displayed below.
|
Note that the limitation will be applied on the Prepare import run form, not on the Import configuration form. In general, it is a good practice not to grant the latter form to roles other that ADMIN and key users. |