PDF report template
A report template is necessary to generate files in PDF via Reports or directly generated from Forms via Button, Icon or Link components.
Configuration
This template must be configured in combination with Jaspersoft, as follows:
1. Create a report template in IS Tools
-
In Report wizard create a report with the fields you want to include in PDF. In the last window, click on the Separate sheet for report information checkbox.
If you intend to print information from a single record in the final PDF document, you must tick the Force one main record setting.
In case your report contains more than one table, make sure all fields have unique headings (i.e., column names); for example, having the tables Order and Item, might be that both have a field called "Total"; in that case, edit the name of one of them in the Rename headings window of the Report wizard, e.g., "Item total"
-
Run the Report in Report manager choosing "Excel 2007" as Format.
-
Download the report in Report and import queue once is ready.
2. Create a report template in Jaspersoft
-
Open Jaspersoft studio. Basically, this tool requires the creation of two elements: the Data adapter (jrdax file), which is used to import fields from the IS Tools report template, and the Jasper report (jrxml file), which contains the design of the future PDF file. In this way, many Jasper reports can come from a single Data adapter.
-
Create a Data adapter: Click File on the menu, New, Data Adapter, type the desired File name, then choose Microsoft Excel in the list of Data adapters, and then click on the File button to browse the IS Tools report you downloaded in the previous step. Finish.
-
Create a Jasper report:
-
Click File on the menu, New, Jasper Report, type the desired File name, then choose the Data adapter that you created in the previous step, and go Next until Finish.
-
In the Outline section, select the report to display its Properties. Under Report, click on Edit query, filter and sort options, select your Data Adapter, and then click on Read Fields.
In order to avoid internal server errors due to data conversion, make sure the proper Class Type is chosen for the fields:
-
For File fields, set Class Type: java.io.File (for that, click on Edit query, filter and sort options, then double-click the field and enter the class).
-
For Number fields, keep the java.lang.String if you wish to display it as is. But if you wish to set a numerical pattern for currency and to limit the number of decimals at a later stage, then set java.lang.Number.
-
For Checkbox fields, use java.lang.String if you want to display its value as 0/1, or java.lang.Boolean to display true/false instead (or the respective words according to the language of the user running the report, e.g., sant/falskt, for Swedish).
-
For the rest of the fields, keep java.lang.String.
Finally, click on OK. Now all your fields are available in the Outline section, and will be added at a later stage.
-
-
To add a title or a page header, or any label, drag and drop a Static Text from the Palette.
-
To add images like logotypes or any image not stored in File fields, drag the wished files from your computer and drop them into My Reports in your Jaspersoft Project Explorer section (or copy and paste them directly into this location C:...\JaspersoftWorkspace\MyReports). Then drag and drop them from the Project Explorer to the canvas.
-
To add fields (except for File fields, which will only be used as sources for images), drag and drop them from the Outline section to desired band of the canvas. Read a remark regarding the font of fields, and a tip for design layout.
-
To add images from File fields, drag and drop an Image element from the Palette, and choose Custom expression, click on the Pencil icon and then click on Fields, then double-click on the wished File, e.g.,
$F{MyFileField}
Click on Finish and OK.
After that, go to the Properties of the selected image, and under Image set On error type: Blank. This setting is mandatory to prevent errors due to possible file extensions other than png, jpg, jpeg, etc.
-
To add barcodes or QR codes, drag and drop a Barcode element from the Palette, and choose the type of your preference. After that, go to its Properties and under Barcode click on the Pencil icon of the Code expression and then click on Fields, and double-click on the field that contains the value of the barcode/QR code (e.g., $F{MyTextField}.
-
Optionally, add the current date and page number to the footer area.
-
Finally, export the report: Click on File, Export, Next, make sure you select the .jrxml file and the logotypes or images of your report. Browse the location where you want to save it, choose the zip format, and then Finish.
-
3. Associate the reports
-
Upload the zipped Jasper report to Report macro files.
-
Attach the file to the IS Tools report template.
-
-
In Report manager, select the source report, click on the Edit icon, and select the previously uploaded file in the Macro/transform box. Save.
4. Generate the PDF file
There are two options to do it:
-
Run it from Report manager, choosing "PDF" as Format.
-
Run it from a form.
-
To generate it and save it into a File field, in Form designer add a Button component to your form and click on its Run and click property, then type
call runReportImmediateAndStore(REPORTID, 'PDF', FILEFIELDNAME), i.e.,call runReportImmediateAndStore(100431, 'PDF', "My File Field"). Save. -
Or if you prefer to generate it and download it right away, add a Button component to your form and click on its Run and click property, then type
call runReportImmediate(REPORTID, 'PDF'). Save. -
On the rendered form, click on the Button.
-
Tips
Use groups in Jaspersoft
In Jaspersoft, groups are a way to organize your report data into logical sections based on the value of a specific field or expression.
When you create a group, JasperReports will automatically:
-
Sort the data by the group’s expression.
-
Insert special sections in your report called Group Header and Group Footer.
A group changes whenever the value of the group expression changes as the report runs.
Groups are useful for:
-
Organizing data hierarchically, e.g., group contact info orders by worksite, then by employee.
-
Adding subtotals or summaries, e.g, show total employees for each worksite in the Group Footer.
-
Repeating headers for each section, e.g., display the customer name at the start of each invoice group.
A guide for groups in Jaspersoft is found here.
Ideas for layout
The way you design your PDF file is flexible, for example, you can combine a single record with multiple related records.
To add fields with a layout of rows and columns (similar to a Table section in IS Tools), drag and drop the desired fields from the Outline section to the Detail band of the canvas. Note that the heading is automatically added into the Column Header band.
You can use any band you want for the fields of a single record, but for related records, only Detail and Column Header bands should be used. For example, having the table "Item" related to "Order", where many items belong to the order printed in PDF, "Item" fields must be dropped into the Detail band. If you are designing a report for a single record, let’s say, "Order", you may delete the Column Header and the Detail bands if you are not planning to use any rows and columns layout, in order to gain more space for the remaining bands. You can always add them back from the Outline section.
In our Example topic you will find a jasper report ready to download, where you can see the design mentioned above.
Set a default value
-
For fields that are java.lang.string, you can set a default value when null; for example, to display "N/A" for the field "Description" instead of leaving the field empty, type
($FCreate PDF reports in IS Tools using Jaspersoft templates. Configure in the Report wizard, design in Jaspersoft Studio, then associate the file and run as PDF..equals("")) ? "N/A" : ($FCreate PDF reports in IS Tools using Jaspersoft templates. Configure in the Report wizard, design in Jaspersoft Studio, then associate the file and run as PDF.)
as Expression under Text Field tab property.
-
For fields that are java.lang.number, for example, display "$ 0.00" for the field "Total" instead of leaving the field empty:
($F{Total} == null) ? "$ 0.00" : $F{Total}
-
For Checkboxes fields, in case you want to set "Yes" or "No" instead of true/false or 1/0:
-
If java.lang.boolean:
($F{Checkbox} == false) ? "No" : "Yes"
Be aware that the above expression will not work for a user with a language other than English in IS Tools (e.g., Swedish would result in "falskt" instead of "false"). If you have other languages than English in your application, we recommend you to use Checkbox with java.lang.string instead.
-
If java.lang.string:
($F{Checkbox}.equals("")) ? "No" : "Yes"
-
In case of large Note field value
Even though Note fields are also class java.lang.string, they can come from IS Tools with line breaks, which can make difficult to guess how much height the field element in Jaspersoft should have to fit all data. If this is your case, we have the following alternatives:
-
Select the field in the canvas, and look for the Text Adjust setting under Text Field tab property.
-
You may set StretchHeight to overflow the data out of the limits of the field element, but for this you need to make sure to add a Break element (from the Palette) right after the Note field, so that the next fields will start in a new page, to avoid the mentioned overflow on them.
-
In case you know that the number of lines in the Note will not vary that much according to its size, set Scale Font so that the font size can be automatically reduced to fit all data into the field element. The downside is that if the data is too much in comparison with the size of the element, the font will be tiny.
-
-
Automatically remove the line breaks by setting html as Markup, under the Text Field tab.
Alternative to Labels
Usually, for labels, the Static Text element from the Palette is used. But if you find cumbersome to add and place one next to each field you have, the alternative is not to use any and instead have the label typed into the field. For that, select the desired field, and type for example
"Address: " + $F{Address}
as Expression under the Text Field tab property. A combination of label and default value would be like:
($F{Address}.equals("")) ? "Address: N/A" : ("Address: " + $F{Address})
or
"Address: " + (($F{Address}.equals("")) ? "N/A" : $F{Address})
For Number field values
For Number fields that were set as java.lang.number:
-
Empty fields are naturally printed as "null". To avoid this, there are two alternatives:
-
Set the property Blank when NULL (under the tab Text Field that appears when the field is selected).
-
Set a default value, like "0". For that, type
($F{Number} == null) ? "0" : $F{Number}
as Expression under Text Field tab property.
-
-
To apply currency, decimal separator and decimal limitation, select the field in the canvas, then in the Text Field properties, add this Pattern:
$ #,##0.00;$ -#,##0.00
which would return "$ 1,234.56" for the original value "1234.5678". Or use one of the options Jaspersoft offers as Pattern. If you want to combine a Pattern, a label, and a default value, be careful to include in the Expression the label only for the default value, like this:
($F{Number} == null) ? "Number: 0" : $F{Number}
And, in the Pattern, include the label as well, but without quotation marks, like:
Number: $ #,##0.00;$ -#,##0.00
In case of large static text
For large static text, for example, terms and conditions of a quote you want to print into your PDF, use the Static Text element from the Palette, and paste your text by double-clicking it. You may want to style it with some html, and for that you must choose html as Markup under the Static Text tab property, and then double-click the text to add for example
<br></br>
to have a line break between paragraphs.
Checkmark instead of Checkbox field value
For Checkbox fields, if you want to display it as a checkmark instead of the value 1/0 or true/false value, do like this:
-
Upload to Jaspersoft two images you like of checked and unchecked tick boxes. Do this by dragging the wished files from your computer and dropping them into My Reports in your Jaspersoft Project Explorer section (or copy and paste them directly into this location C:...\JaspersoftWorkspace\MyReports).
-
Create two parameters that later will control the image to be displayed according to the value of the checkbox. For that, in the Outline section, right-click on Parameters, click "Create Parameter", as name type "checkbox1" (without quotation marks), uncheck "Is For Prompting", and in the "Default Value Expression" type
new java.lang.String("Checked.png")
replacing the name of the image according to yours. Follow the same procedure for the second parameter, and let’s call it "checkbox0"
-
Drag and drop an Image element from the Palette and click on the option "No image (just create an image element, expression will be modified later)", and then "Ok". Once its properties are opened, click on Image tab and, in case your Checkbox was defined as java.lang.boolean, type this as Expression:
$F{Checkbox} == false ? $P{checkbox0} : $P{checkbox1}
Be aware that the above expression will not work for a user with a language other than English in IS Tools (e.g., Swedish would result in "falskt" instead of "false"). If you have other languages than English in your application, we recommend you to use Checkbox with java.lang.string instead.
If your Checkbox is java.lang.string, type:
$F{Checkbox} == null ? $P{checkbox0} : $P{checkbox1}
File name
For images from your File fields you may want to add the name of the file as well. For that, add a Text Field element from the Palette below the Image, with the Expression getName(), e.g.,
${MyFileField}.getName()
New pages
Try any of these alternatives:
-
Under the Outline section, select your report, and set Title On A New Page and/or Summary On A New Page, under Properties section.
-
Add a Break element from the Palette into the canvas at any point you wish to start a new page.
Automatic calculations
Do the following steps:
-
Define a variable. In the Outline section, right-click on "Variable" and then click on "Create Variable". In Properties Type a Name, for example Grand Total. Type java.lang.number as Value Class Name. Choose a Calculation, for example, Sum. In Expression, add the proper field, for example
$F{Item Total}
This means that we are creating a variable that will store the sum of all item totals.
-
Define the field. Drag and drop a Text field from the Palette into the canvas. Under Text Field property tab, add as Expression the variable you just created, i.e.,
$V{Grand Total}
Think of adding a Pattern as well, like:
$ #,##0.00 + VAT
Document your design
Drag and drop the Note element from the Palette to shortly described what you have done here and there, to easily keep track of important references and changes in your design.
Using custom fonts
Custom fonts in JasperReports allow you to match your reports with your brand’s visual identity or improve the readability and aesthetics of your documents. By default, JasperReports comes with a limited set of fonts. Adding your own gives you full control over typography, ensuring consistency across exported PDFs and print outputs.
Steps to add and use custom fonts
-
Open Preferences
-
In Jaspersoft Studio, Navigate to
Window → Preferences.
-
-
Navigate to Fonts
-
In the Preferences window, go to
JasperReports → Fonts.
-
-
Add Your Font
-
Click the
Add from URLbutton to add a font from an online location. -
Click the
Add from Pathbutton to add a font from your local file system.
-
-
Apply Changes
-
Press the
ApplyorApply and Closebutton to confirm the added fonts.
-
-
Export the Font
-
Select the font(s) you want to use.
-
Click the
Exportbutton and save the resulting.jarfile in the same directory as your.jrxmlreport file.
-
-
Design Your Report
-
Use the newly added font in your Jasper report by selecting it from the font dropdown when editing text elements.
-
-
Bundle Fonts with Report
-
Include the exported
.jarfont file alongside the.jrxmlwhen exporting your report zip-file.
-
-
Ready to Use
-
Add the zip-file to Report macro files.
-
Edit an existing template
If your changes are only a matter of design, then save, and:
-
Update the macro file. Open the "Report macro files" in IS Tools, and click "Choose file" in the row where your previous file is. Select the zip file you just exported. A message confirming that your file is updated will pop up.
-
You can now generate your report in "Report manager" or whatever form that contains the Button or component connected to this report template.
If your changes are about adding new fields, do the following:
-
In the "Report manager", edit the report template in question adding the proper fields; remember to ensure that the new fields have unique headings in comparison with the previous fields. Save.
-
In Jaspersoft, select your report in the Outline section, and click on the Edit query, filter and sort options property. There, click on Add, type the Field Name exactly as its heading in IS Tools, and define its class. Click on Ok.
-
In the Outline section, expand Fields, and drag and drop the new elements into the canvas as you wish. Save, export and update the macro in IS Tools.
|
If the new fields are many, instead of adding them manually as described above, you may consider to update the connected Data adapter:
|
Example
This example is based on the tables "Order" and "Item", related as one-to-many. First, a report template in IS Tools was created with the following fields:
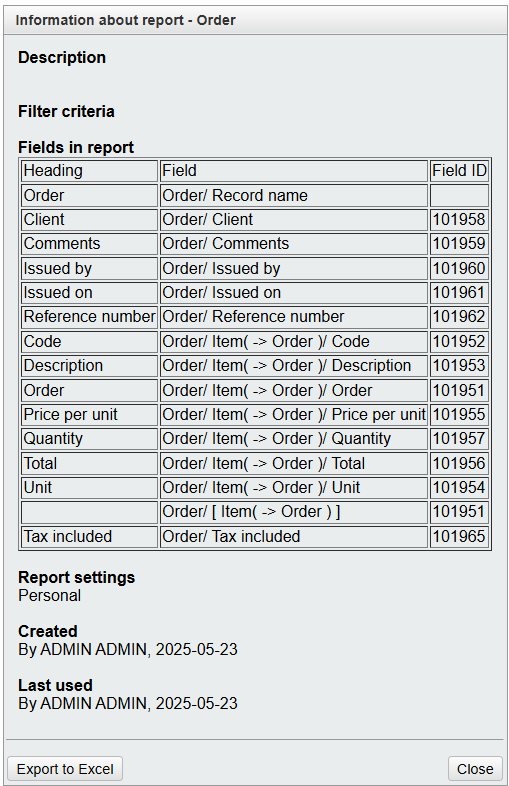
You can download this report here.
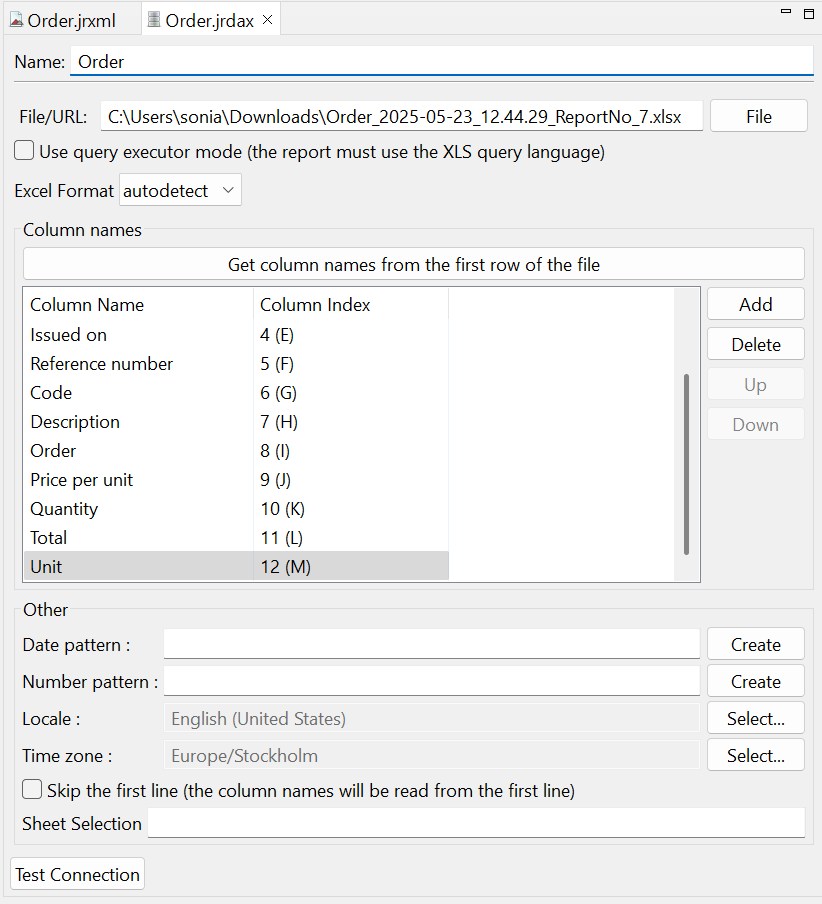
Then, in Jaspersoft, a Data adapter was created (Order.jrdax):
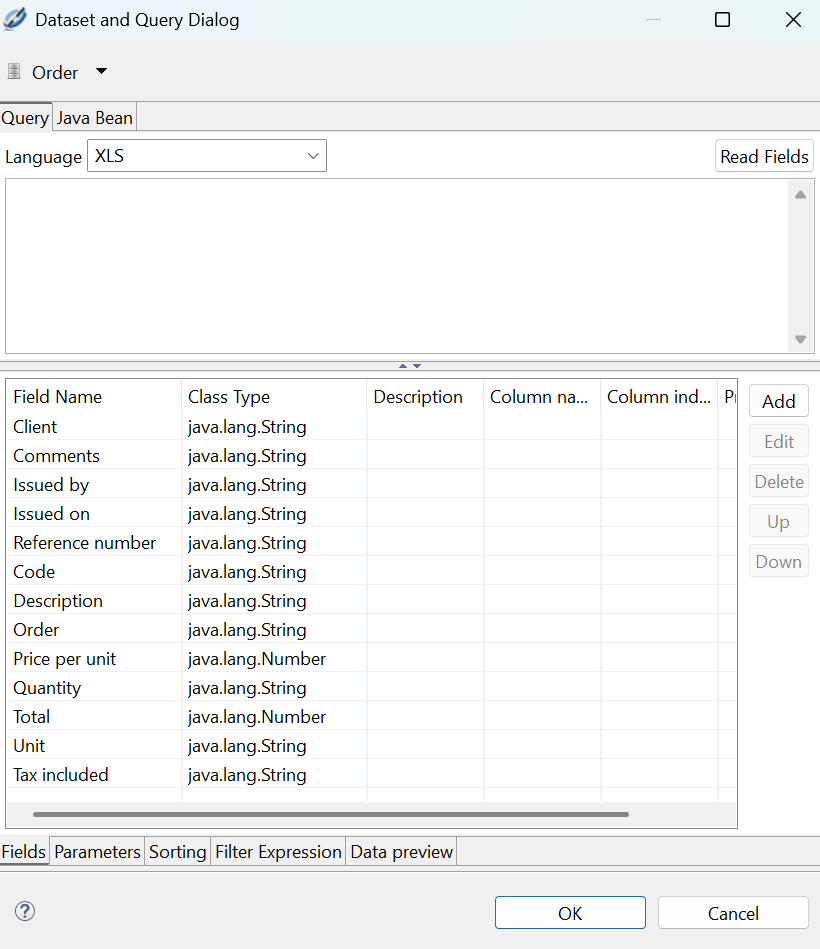
This is how the classes of the fields were edited, via the Edit query, filter and sort options property of the Jasper report (once selected in the Outline section), where the Data adapter was connected to it:
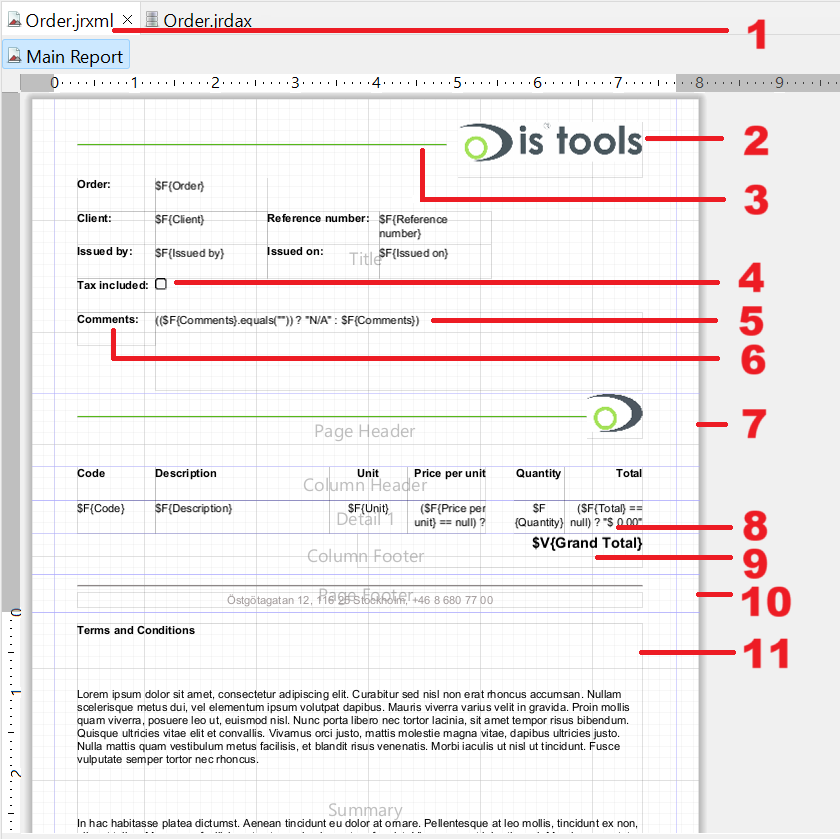
The design of the Jasper report (Order.jrxml), as follows, and downloadable here.
-
The properties set to the report were Summary On A New Page and Summary With Page Header And Footer.
-
An image file from the Project explorer was added to the top of the Title band. Note that this band contains the fields of the main table "Order".
-
A Line element was added with Forecolor.
-
An Image element from the Palette was added with this Expression:
$F{Tax included} == null ? $P{Checkbox0} : $P{Checkbox1}
where $P{Checkbox0} and $P{Checkbox1} are parameters previously created, with Default Value Expression as
new java.lang.String("Not Checked.png")
and
new java.lang.String("Checked.png")
respectively.
-
Field with default value defined as Expression:
$F{Comments}.equals("" ? "N/A" : $F{Comments})
-
All labels, added as Static Text from the Palette, were set to font Arial and styled as Bold, while fields remained with the default font SansSerif, which does not support Bold. Read more about this in the Remarks.
-
An image file and a Line were added to the Page Header band. This will be printed right after the content in the Title band as the report property Title On A New Page was not set.
-
Fields of the related table "Item" were added to the Detail band (and then its labels automatically added into the Column Header band). The "Price per unit" and "Total" fields were set the Pattern:
$ #,##0.00;$ -#,##0.00
and a similar Expression:
($F{Price per unit} == null) ? "$ 0.00" : $F{Price per unit}
-
A Variable was created as java.lang.Number, with Calculation Sum and Expression $F{Total}. Then added to the Column Footer band with Pattern:
Grand Total: $ #,##0.00
and Expression $V{Grand Total}. It was styled with right alignment, Arial, Bold, and increased font size.
-
On the Page Footer band, a Line element was added, together with a Static Text.
-
This Static Text element was added to the Summary band, and set to Markup html, in order to use <b></b> and <br></br> to set first line as bold, and line breaks between paragraphs.
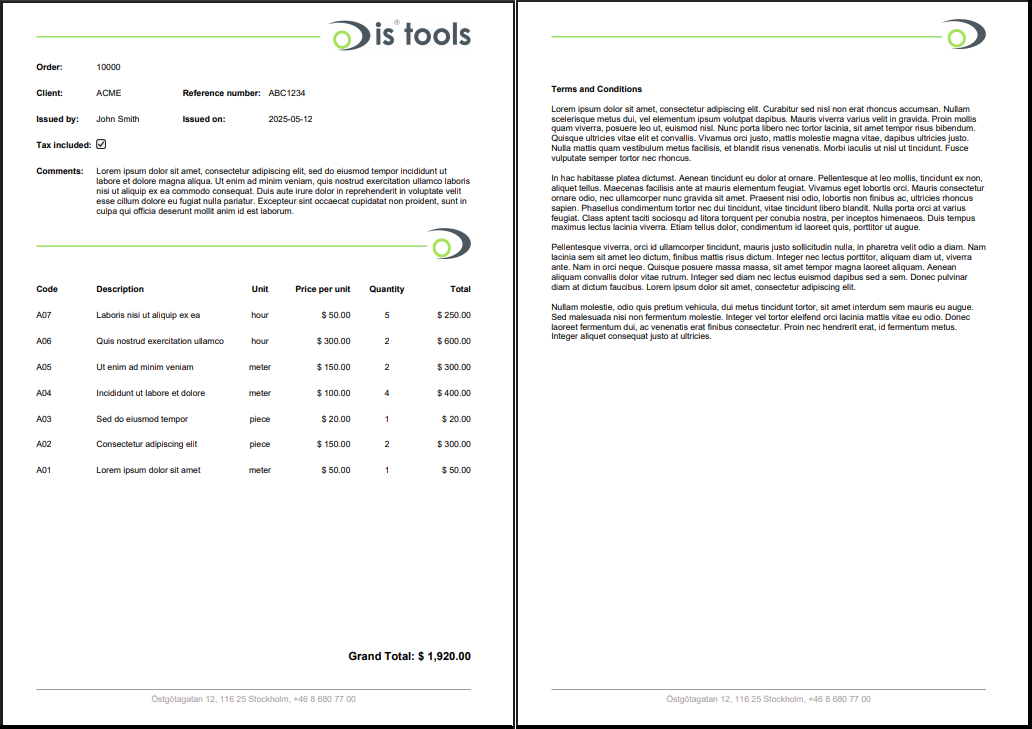
Below, the generated PDF in IS Tools:
Remarks
-
Not all functionality from Jaspersoft studio is described above, but only what is supported by the IS Tools reporting tool.
-
By default, Jasperstudio applies SansSerif font to Static Text and fields, but this font does not work in combination with Bold and Italic styles, which are removed once the PDF is printed. If you wish to use those styles, change the font to Arial on the elements in question. Choosing a font other than those two might lead to errors during the PDF generation.
-
The Preview tab in Jaspersoft studio does not reflect the final result of the generated PDF file.
-
There is a limitation on the PDF file size when it includes images. When exceeded, the rest of the images will not be loaded and their placeholders will be displayed as blank. Read more about Report limitations.
-
In case the PDF file is generated without being stored into a File field, be aware that reports that take a long time will not be downloaded but placed in the Report and import queue instead, and the user will be notified about this. For that, the user must have rights granted in the Report and import queue form.